Documentation
Installation
Git Listener is available for any Jira Cloud installation. Just log in to your Jira account, go the Git Listener Atlassian Marketplace page, and click the button to install the plugin.
Configuration
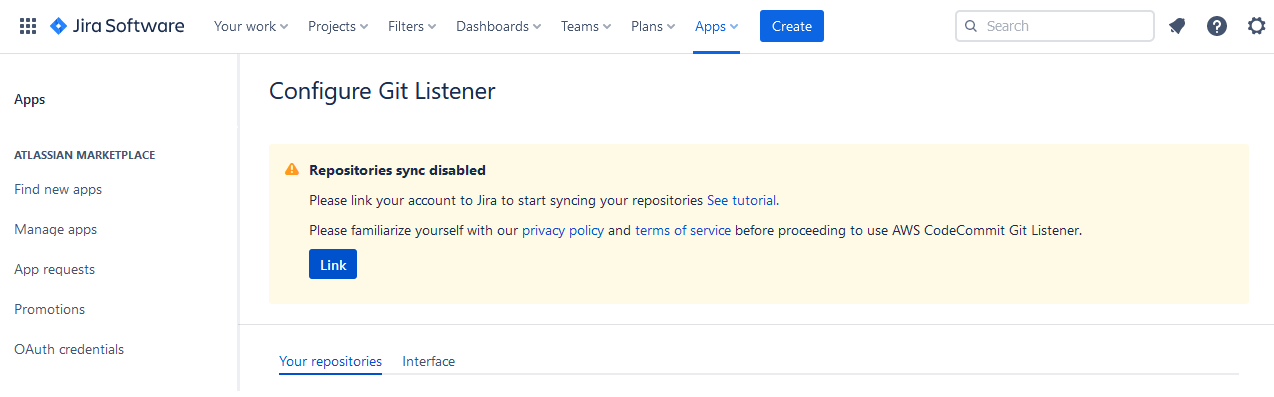
Once Git Listener is installed, find it in the list of your installed apps in Jira and press the "Configure" button.

Now you need to link your repositories to Jira. In order to do that, press the "Link" button.
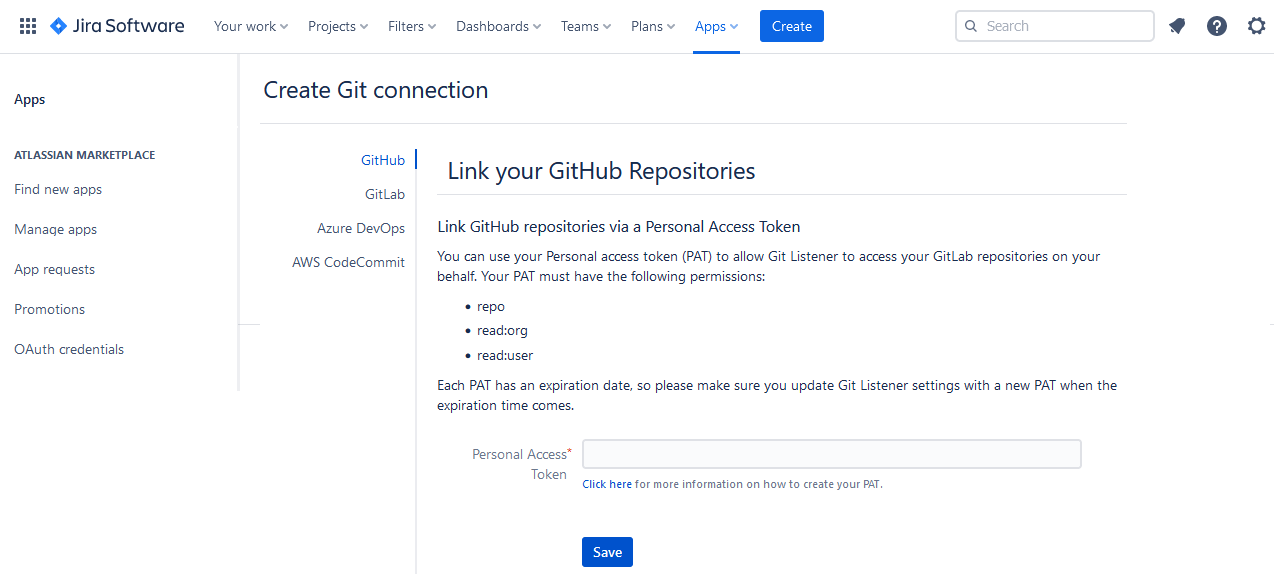
You will be able to choose between different Git providers and different authorization methods. Follow the instructions on each provider's page to link your Git account to Jira.
Git Listener will automatically detect all Git repositories that your Microsoft account has access to and display them on the configuration page. You can configure which of the repositories you want to link to Jira, and see when Git Listener last checked them for new data.
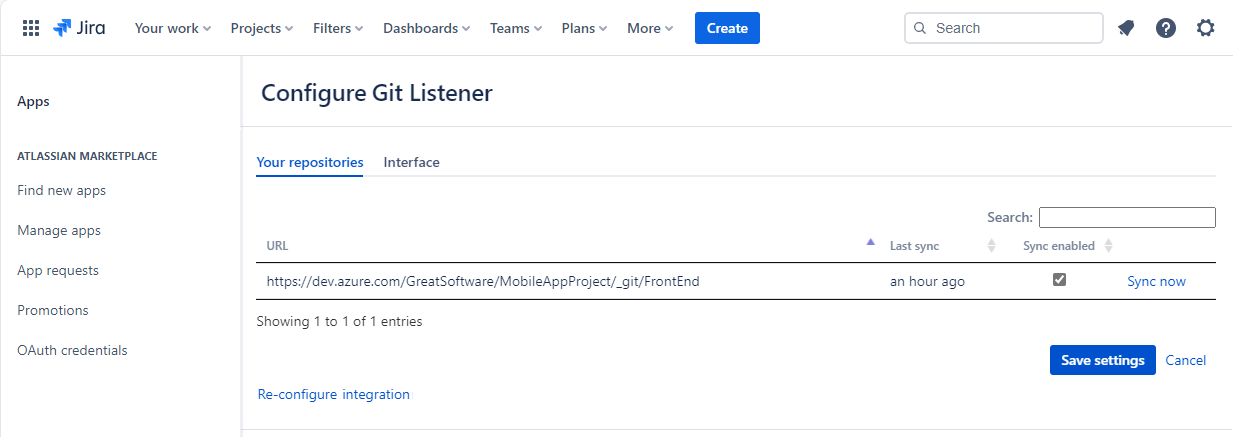
If you need to update the token used to link Git Listener to your repositories, or change the user who needs to grant OAuth permissions, you can always return to Git Listener configuration page and click "Re-configure integration".
Using Git Listener
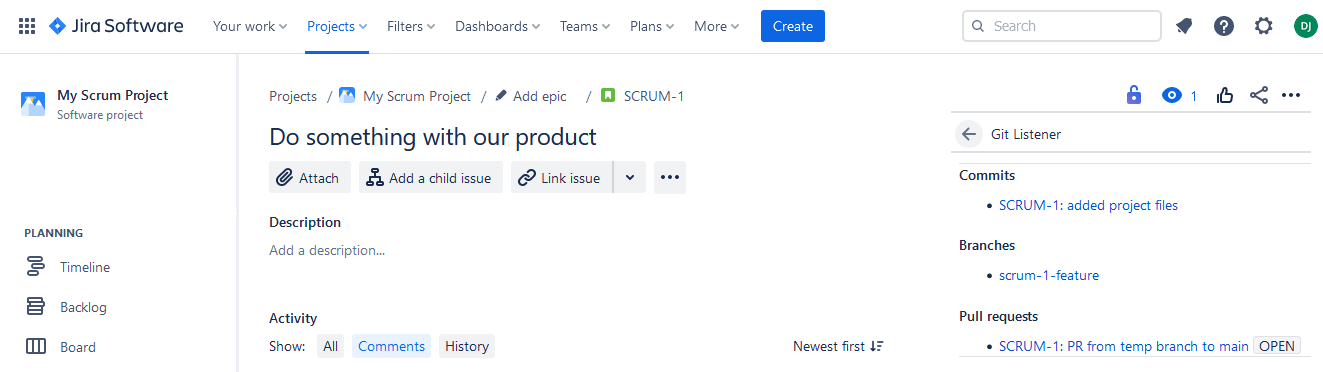
As soon as the configuration is finished, you are ready to use Git Listener. Just navigate to any issue in your Jira project, and you will see Git menu option on the right.

Click on it, an it will display all the Git commits, branches, and pull requests linked to your Jira issue. Linking is done via issue keys (e.g. PROJ-123). That means you will need to include issue keys in your commit and pull request titles, and branch names in order for them to be picked up by Git Listener.
Further information
Feel free to contact us via our feedback form if you have any questions.
Installation
Azure Git Listener is available for any Jira Cloud installation. Just log in to your Jira account, go the Azure Git Listener Atlassian Marketplace page, and click the button to install the plugin.
Configuration
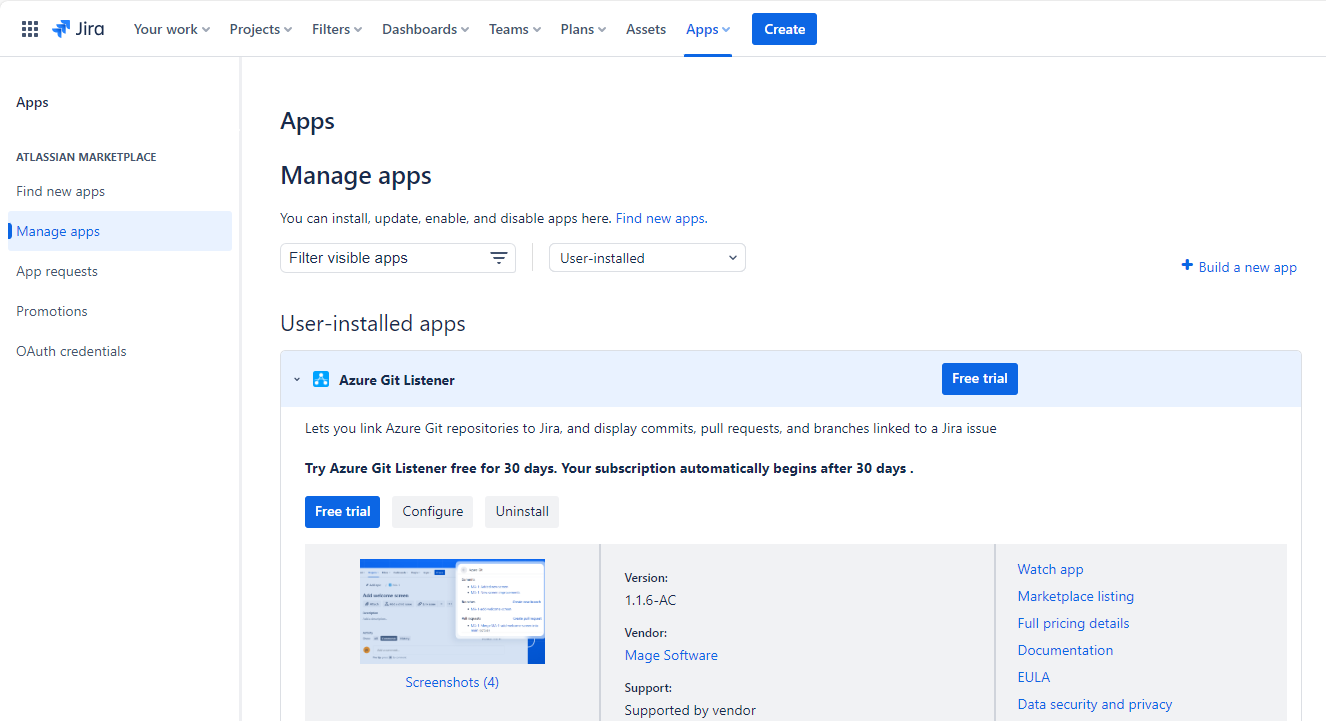
Once Azure Git Listener is installed, find it in the list of your installed apps in Jira and press the "Configure" button.
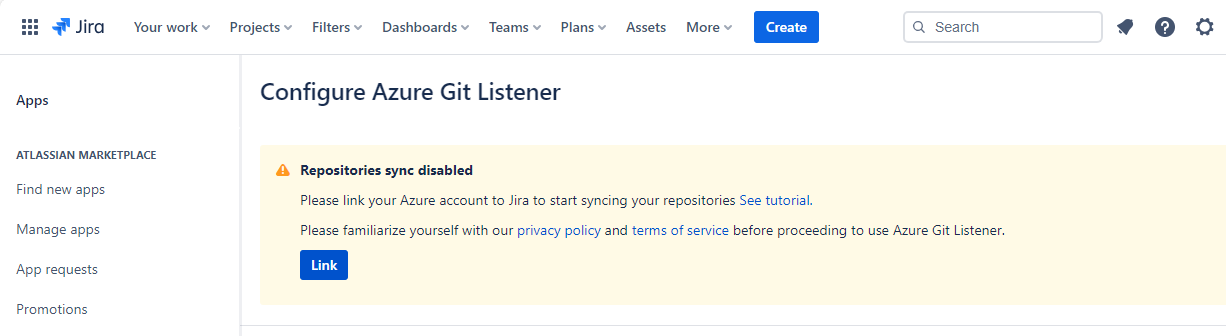
Now you need to link your Azure repositories to Jira. In order to do that, press the "Link" button. You will be able to choose between OAuth (you will be redirected to Microsoft's authentication page where you will choose the account you want to link and provide your credentials) or token-based authorization.
Azure Git Listener will automatically detect all Git repositories that your Microsoft account has access to and display them on the configuration page. You can configure which of the repositories you want to link to Jira, and see when Azure Git Listener last checked them for new data.
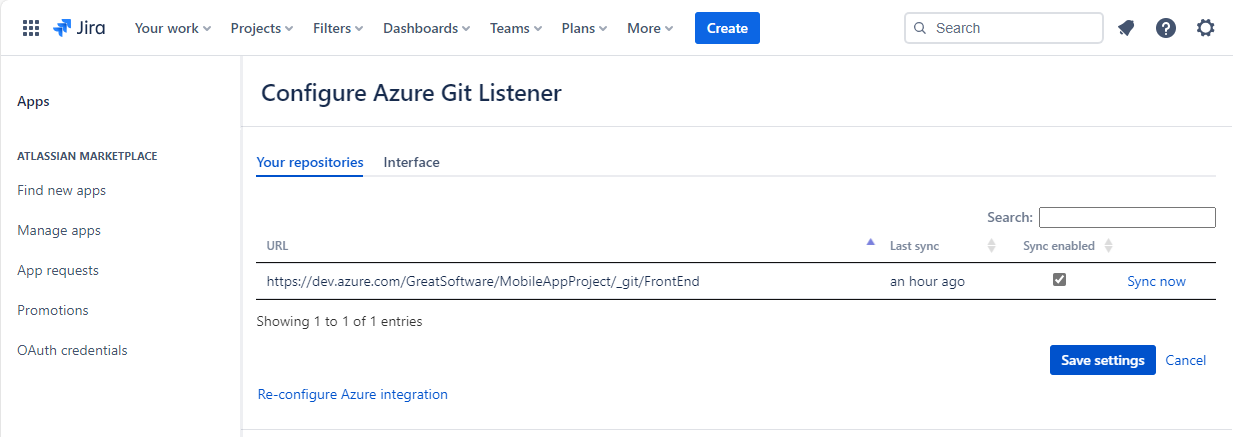
If you need to update the token used to link Azure Git Listener to your Azure repositories, or change the user who needs to grant OAuth permissions, you can always return to Azure Git Listener configuration page and click "Re-configure Azure integration".
Using Azure Git Listener
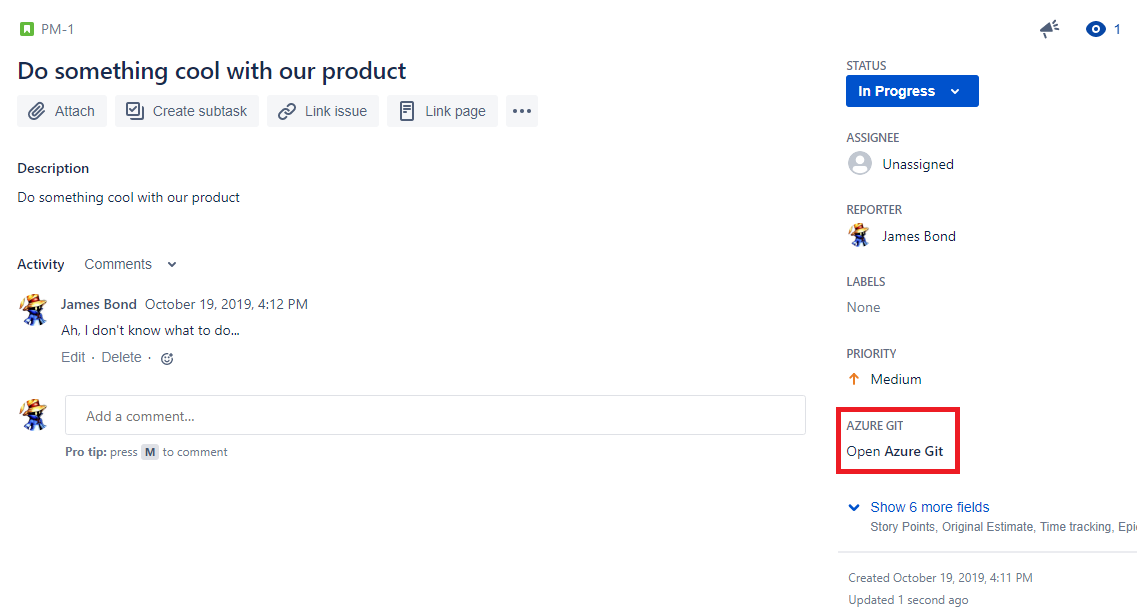
As soon as the configuration is finished, you are ready to use Azure Git Listener. Just navigate to any issue in your Jira project, and you will see Azure Git menu option on the right.
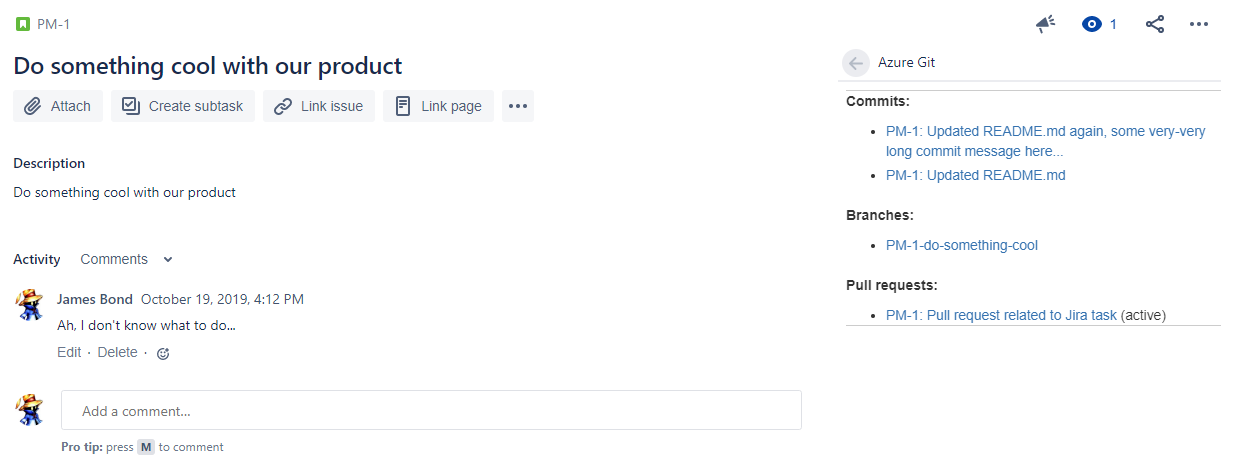
Click on it, an it will display all the Git commits, branches, and pull requests linked to your Jira issue. Linking is done via issue keys (e.g. PROJ-123). That means you will need to include issue keys in your commit and pull request titles, and branch names in order for them to be picked up by Azure Git Listener.
Further information
Feel free to contact us via our feedback form if you have any questions.
Installation
AWS CodeCommit Git Listener is available for any Jira Cloud installation. Just log in to your Jira account, go the AWS CodeCommit Git Listener Atlassian Marketplace page, and click the button to install the plugin.
Configuration
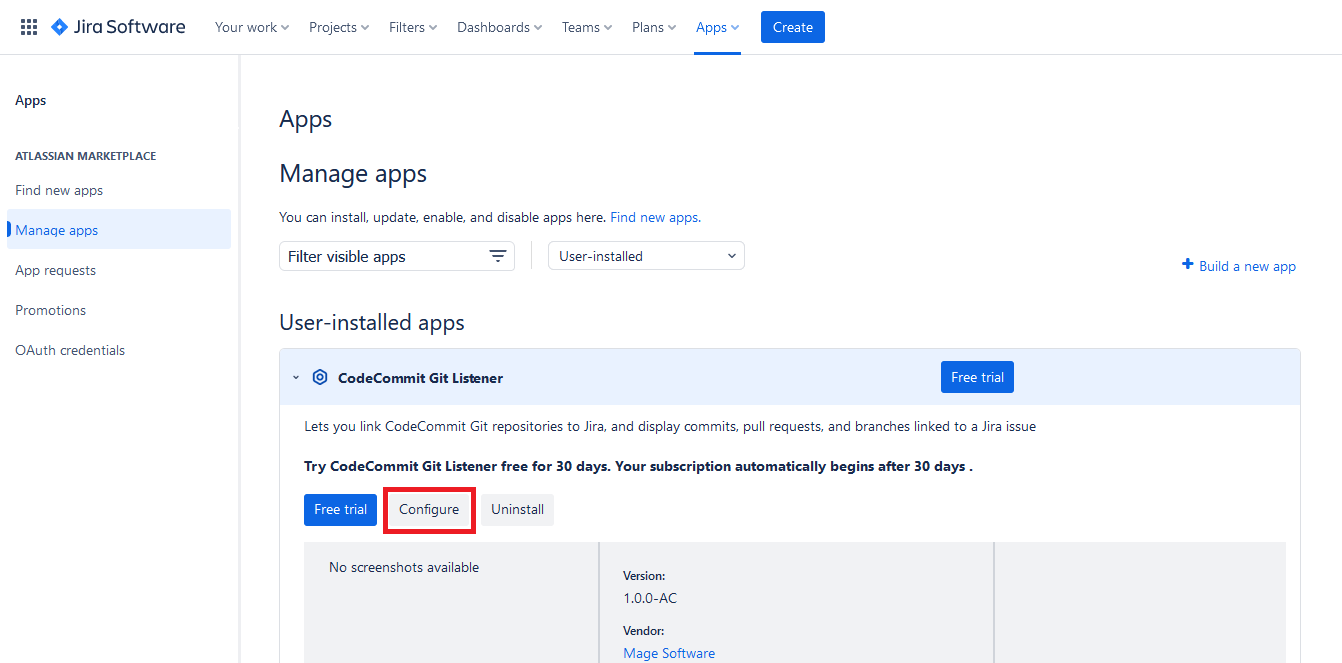
Once AWS CodeCommit Git Listener is installed, find it in the list of your installed apps in Jira and press the "Configure" button.
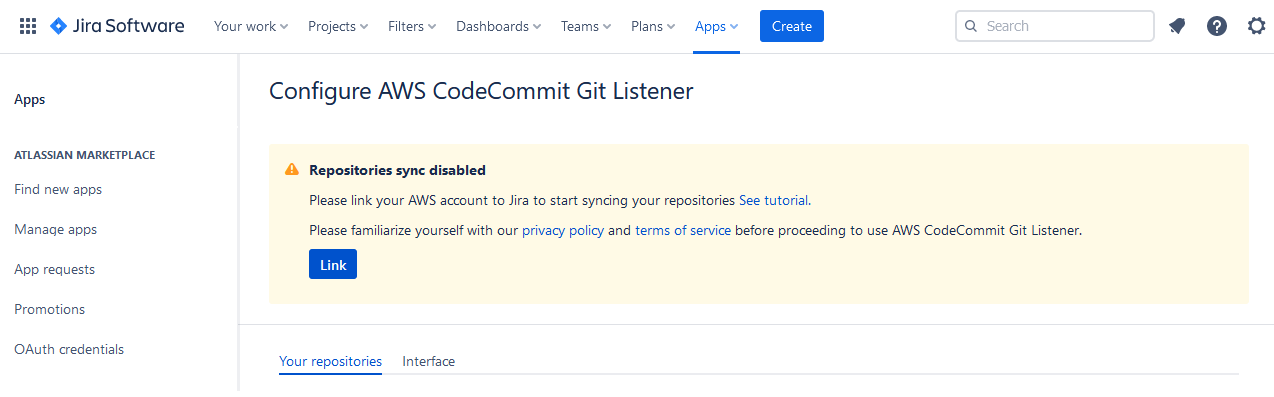
Now you need to link your AWS CodeCommit repositories to Jira. In order to do that, provide your Access Key ID and your Secret Key that you can find or create in your AWS console. We recommended assigning the following permissions to the user that you will link to AWS CodeCommit Git Listener: AWSCodeCommitPowerUser and AmazonSNSFullAccess.
AWS CodeCommit Git Listener will automatically detect all Git repositories that your AWS account has access to and display them on the configuration page. You can configure which of the repositories you want to link to Jira, and see when AWS CodeCommit Git Listener last checked them for new data.
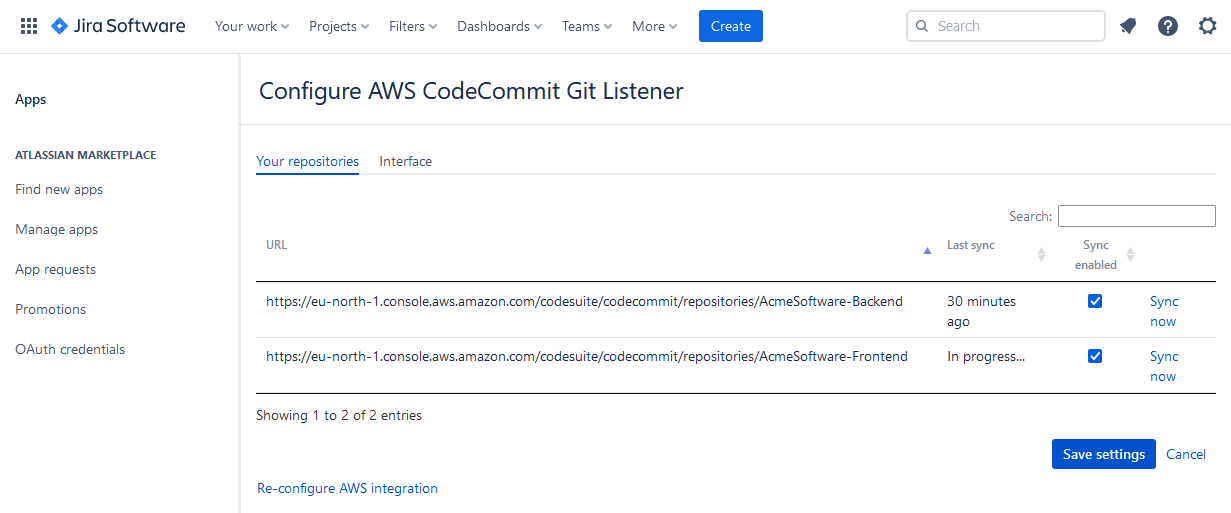
If you need to update the credentials used to link AWS CodeCommit Git Listener to your AWS repositories, you can always return to AWS CodeCommit Git Listener configuration page and click "Re-configure AWS integration".
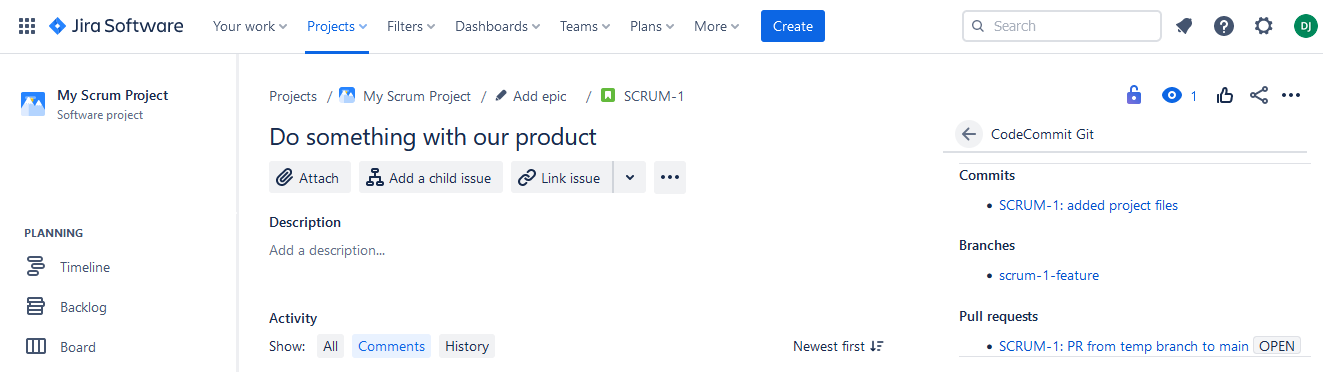
Using AWS CodeCommit Git Listener
As soon as the configuration is finished, you are ready to use AWS CodeCommit Git Listener. Just navigate to any issue in your Jira project, and you will see Azure Git menu option on the right.
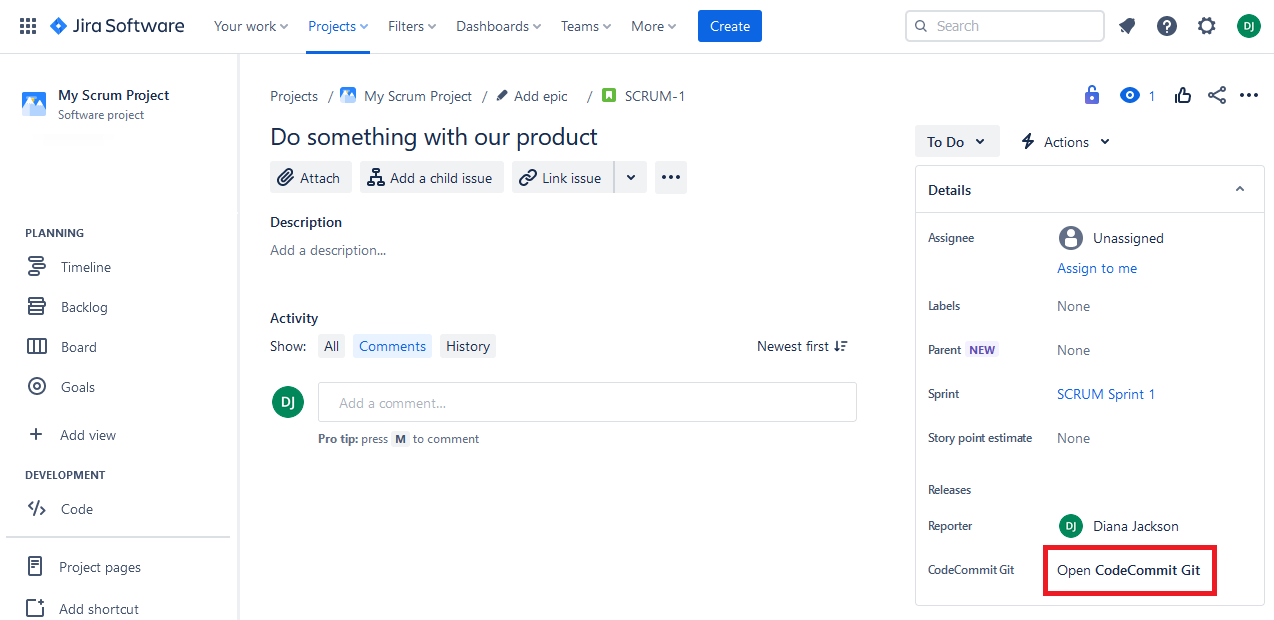
Click on it, an it will display all the Git commits, branches, and pull requests linked to your Jira issue. Linking is done via issue keys (e.g. PROJ-123). That means you will need to include issue keys in your commit and pull request titles, and branch names in order for them to be picked up by AWS CodeCommit Git Listener.
Further information
Feel free to contact us via our feedback form if you have any questions.
Installation
GitLab Listener is available for any Jira Cloud installation. Just log in to your Jira account, go the GitLab Listener Atlassian Marketplace page, and click the button to install the plugin.
Configuration
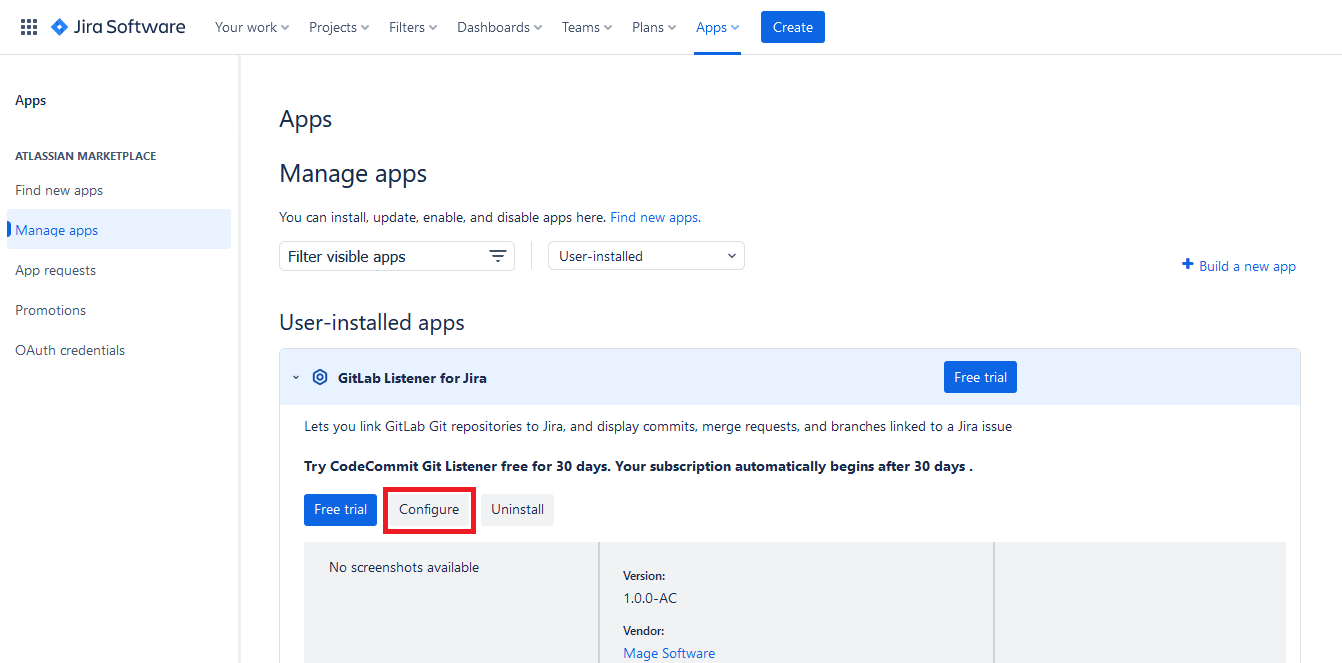
Once GitLab Listener is installed, find it in the list of your installed apps in Jira and press the "Configure" button.
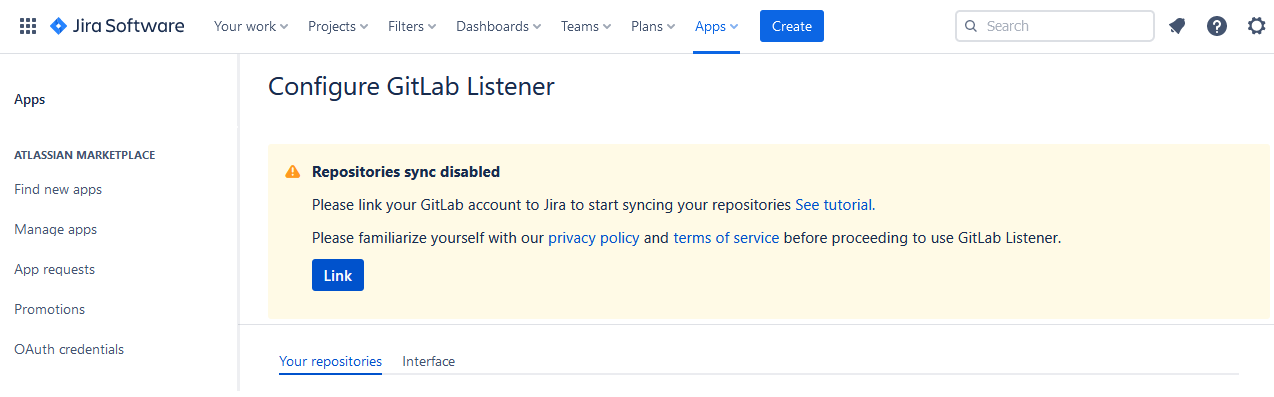
Now you need to link your GitLab repositories to Jira. In order to do that, provide your Personal Accees Token that you can find or create in your GitLab account. The minimum permission scope needed for the token is 'read_api'.
GitLab Listener will automatically detect all Git repositories that your GitLab account has access to and display them on the configuration page. You can configure which of the repositories you want to link to Jira, and see when GitLab Listener last checked them for new data.
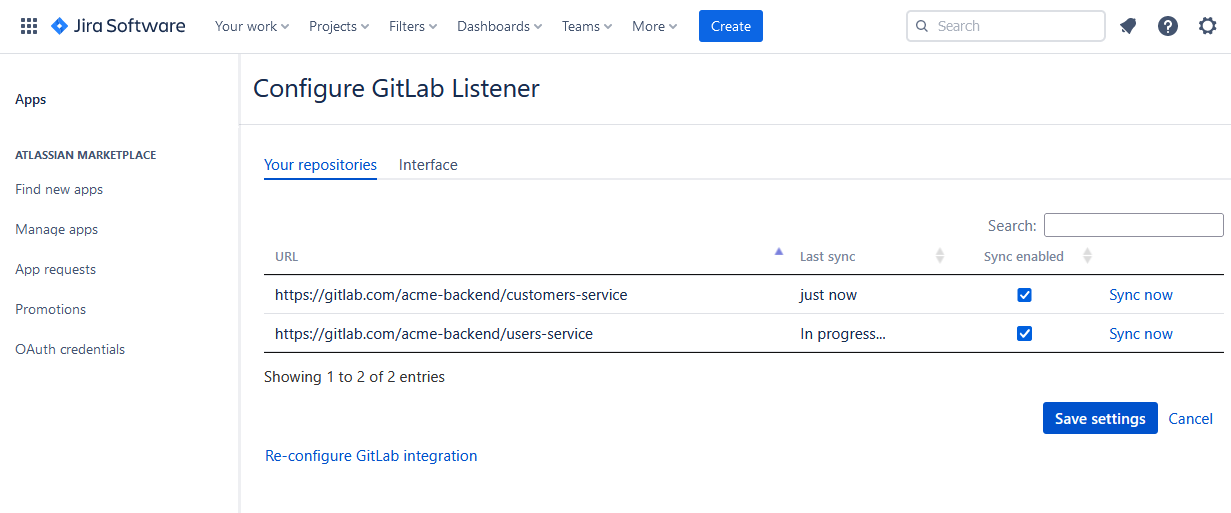
If you need to update the credentials used to link GitLab Listener to your Git repositories, you can always return to GitLab Listener configuration page and click "Re-configure GitLab integration".
Using GitLab Listener
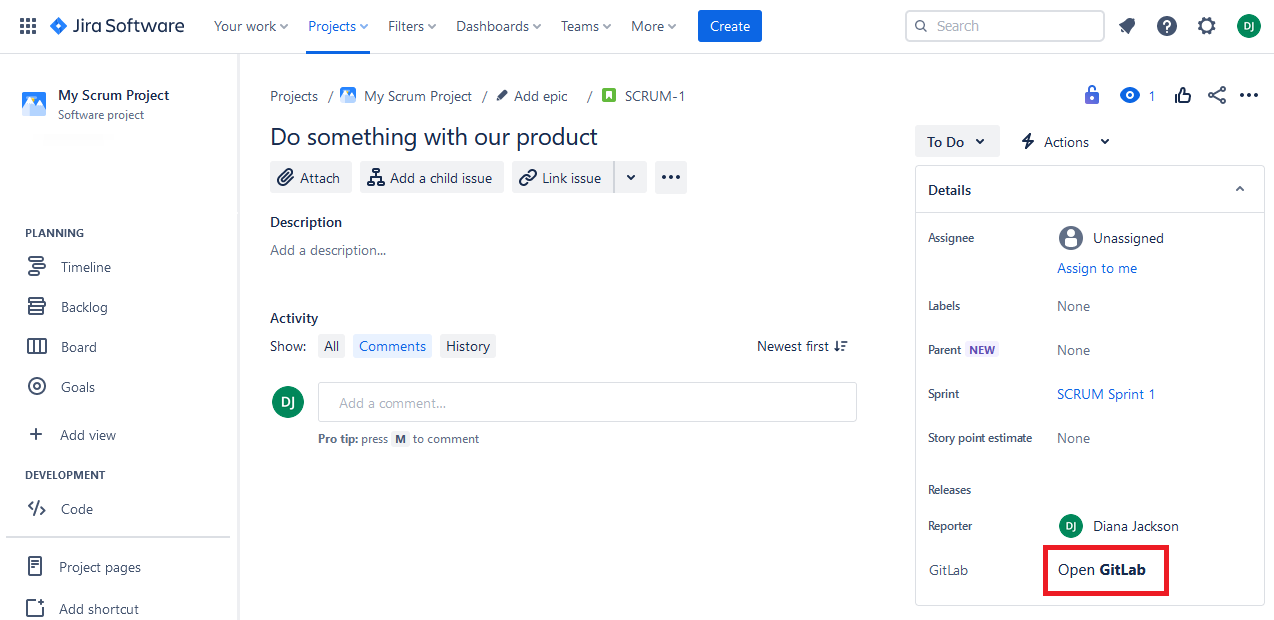
As soon as the configuration is finished, you are ready to use GitLab Listener. Just navigate to any issue in your Jira project, and you will see GitLab menu option on the right.
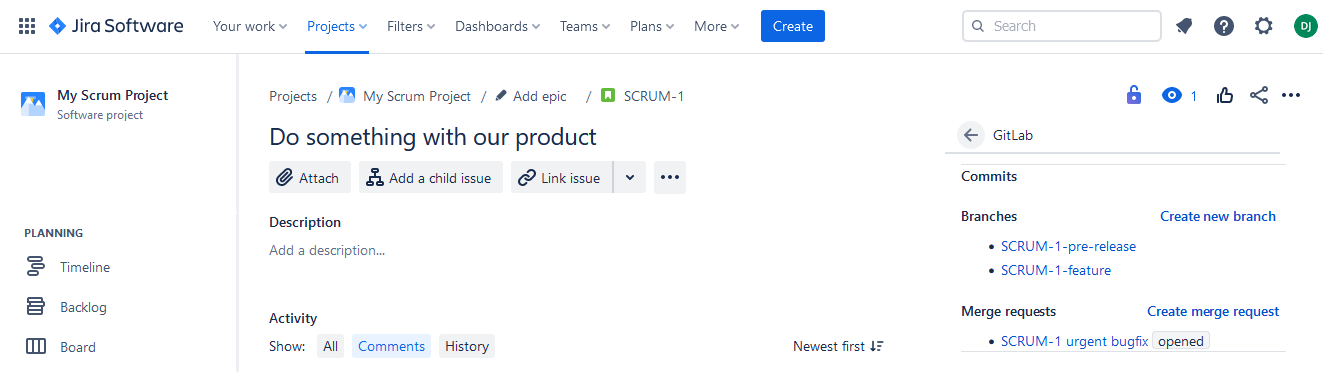
Click on it, an it will display all the Git commits, branches, and merge requests linked to your Jira issue. Linking is done via issue keys (e.g. PROJ-123). That means you will need to include issue keys in your commit and merge request titles, and branch names in order for them to be picked up by GitLab Listener.
Further information
Feel free to contact us via our feedback form if you have any questions.